Proper roof flashing installation is vital to prevent water damage. It ensures the longevity of both the roof and the building structure.
Proper roof flashing functions as a critical component for your home’s weatherproofing system, acting as the last line of defense against water infiltration at roof intersections and penetration points. Ensuring that flashing is expertly installed mitigates the risks of leaks, structural damage, and costly repairs.
It directs water away from vulnerable areas, such as where different materials meet or around roof protrusions like chimneys and vents. A well-executed roof flashing job not only maintains the structural integrity of your property but also upholds its aesthetic appeal. Considering the essential role of flashing in roof protection, hiring a skilled professional for installation is a wise investment for any homeowner looking to safeguard their property.
Understanding Roof Flashing
The role of roof flashing is as crucial as it is often overlooked. This essential component of roofing systems serves to direct water away from critical areas such as joints and valleys, where the roof meets a wall or chimney. Proper installation of roof flashing is not just a recommendation; it’s a necessity to prevent water damage and extend the life of the roof. Let’s delve into why flashing is indispensable and how to ensure it’s correctly applied.
Importance Of Waterproofing The Roof
Waterproofing your roof is vital for maintaining structural integrity. Flashing acts as the first line of defense against water infiltration, which can lead to mold growth, rot, and costly interior damage. Let’s look at a few reasons why proper waterproofing is critical:
- Prevents water leaks, protecting the roof substrate and internal home structures.
- Reduces potential for costly repairs caused by water damage.
- Enhances overall roof longevity, delaying the need for a full roof replacement.
Area-specific Flashing Applications
Different areas of the roof require specialized flashing techniques to ensure complete protection. Here are a few common flashing applications:
| Area | Type of Flashing | Purpose |
|---|---|---|
| Valleys | W-shaped or Open | Channels water down the roof |
| Chimneys | Step and Counter | Seals the intersection between the chimney and roof |
| Skylights | Continuous | Prevents water from pooling around the skylight frame |
| Dormers | Step | Protects the seams where dormer walls meet the roof surface |
Key Materials In Flashing Installation
Selecting the right materials is as important as correct installation for effective flashing. Here are some commonly used materials and their characteristics:
- Aluminum: Lightweight, rust-resistant, and easy to shape.
- Copper: Extremely durable, weathers to a verdigris patina, and is often used for historic restorations.
- Lead: Highly durable and flexible, ideal for complex shapes and configurations.
- Galvanized Steel: Economical, sturdy, and coated to prevent corrosion.
- PVC or TPO: Used primarily in single-ply roofing systems, these synthetic materials offer excellent versatility and water resistance.
Each material offers distinct benefits tailored to the specific needs of the roofing system. A professional roofer can assess which type is best suited for your roof’s unique requirements.
Credit: www.iko.com
Proper Roof Flashing Installation Benefits
One often overlooked aspect in the construction and maintenance of a home is the vital role played by roof flashing. Acting as a guardian against the elements, proper roof flashing installation is integral to maintaining a dry and damage-free home. With the precision installation of roof flashing, homeowners reap significant rewards including the staving off of water penetration, preservation of roof structure integrity, and the mitigation of future financial outlays on repairs.
Prevention Of Water Damage
The cardinal sin in roofing is the allowance of water ingress. Correctly installed flashing provides a seal around roof protrusions, valleys, and joints, directing water away from vulnerable areas. The benefits are tangible:
- Minimized risk of leaks that can lead to costly interior water damage
- Protection of underlayment and roof decking from moisture
- Prevention of mold and mildew formation, preserving air quality within the home
Structural Integrity Of The Roof
Flashings are more than just leak-prevention accessories; they are integral to maintaining the structural soundness of the roof. Benefits of sturdy installation include:
- Helping to maintain the strength of the roof against extreme weather conditions
- Guarding against wood rot and corrosion in the roofing structure
- Ensuring that shingles and other roof materials retain their designed function and placement
Long-term Cost Savings On Repairs
Investing in proper roof flashing initially may seem like an unnecessary expense, but the reality bears out a prudent foresight. Advantages that affect the bottom line include:
- Prolonging the life expectancy of the roof, delaying replacement costs
- Reducing the need for frequent maintenance
- Preventing extensive damage that leads to higher insurance claims and possible premium increases
Types Of Roof Flashing
The unsung hero of roof durability, roof flashing, plays a critical role in keeping your home dry and free from damage. Installing roof flashing is not just a recommendation; it’s a necessity to prevent water penetration at the various joins and edges on your roof. Understanding the different types of roof flashing is the first step to ensuring that your home stands strong against whatever the elements throw at it.
Roof flashing comes in various forms, each designed to protect specific parts of your roof. Here, we’ll dive into the most common types: step flashing, valley flashing, and flashing for chimneys and skylights. Each type serves a unique function, but all are vital for preventing water ingress and ensuring the longevity of your roof.
Step flashing for walls and dormersStep Flashing For Walls And Dormers
Step flashing is crucial wherever a roof meets a vertical wall or surface, such as alongside dormers or rising walls. Its design allows for a secure overlap, ensuring that each shingle’s edge is adequately protected from water runoff.
- Constructed from galvanized steel, copper, or aluminum
- Each piece interlocks with the course of shingles, creating a watertight seal
- Requires meticulous installation to function effectively
Improperly installed step flashing can lead to leaks, which underscores the importance of professional installation.
Valley flashing for roof foldsValley Flashing For Roof Folds
When two roof planes intersect, they create a valley – a potential hotspot for water collection. Valley flashing is designed to channel that water safely away. This metal flashing is often exposed or concealed beneath shingles, depending on the chosen method.
| Type | Description | Materials |
|---|---|---|
| Open Valley | Flashing is visible, offering a durable path for water | Aluminum, Steel, Copper |
| Closed Valley | Shingles cover the flashing, providing a seamless look | Ice-and-Water Shield |
Correct installation of valley flashing is essential to handle the high volume of water runoff experienced in these areas.
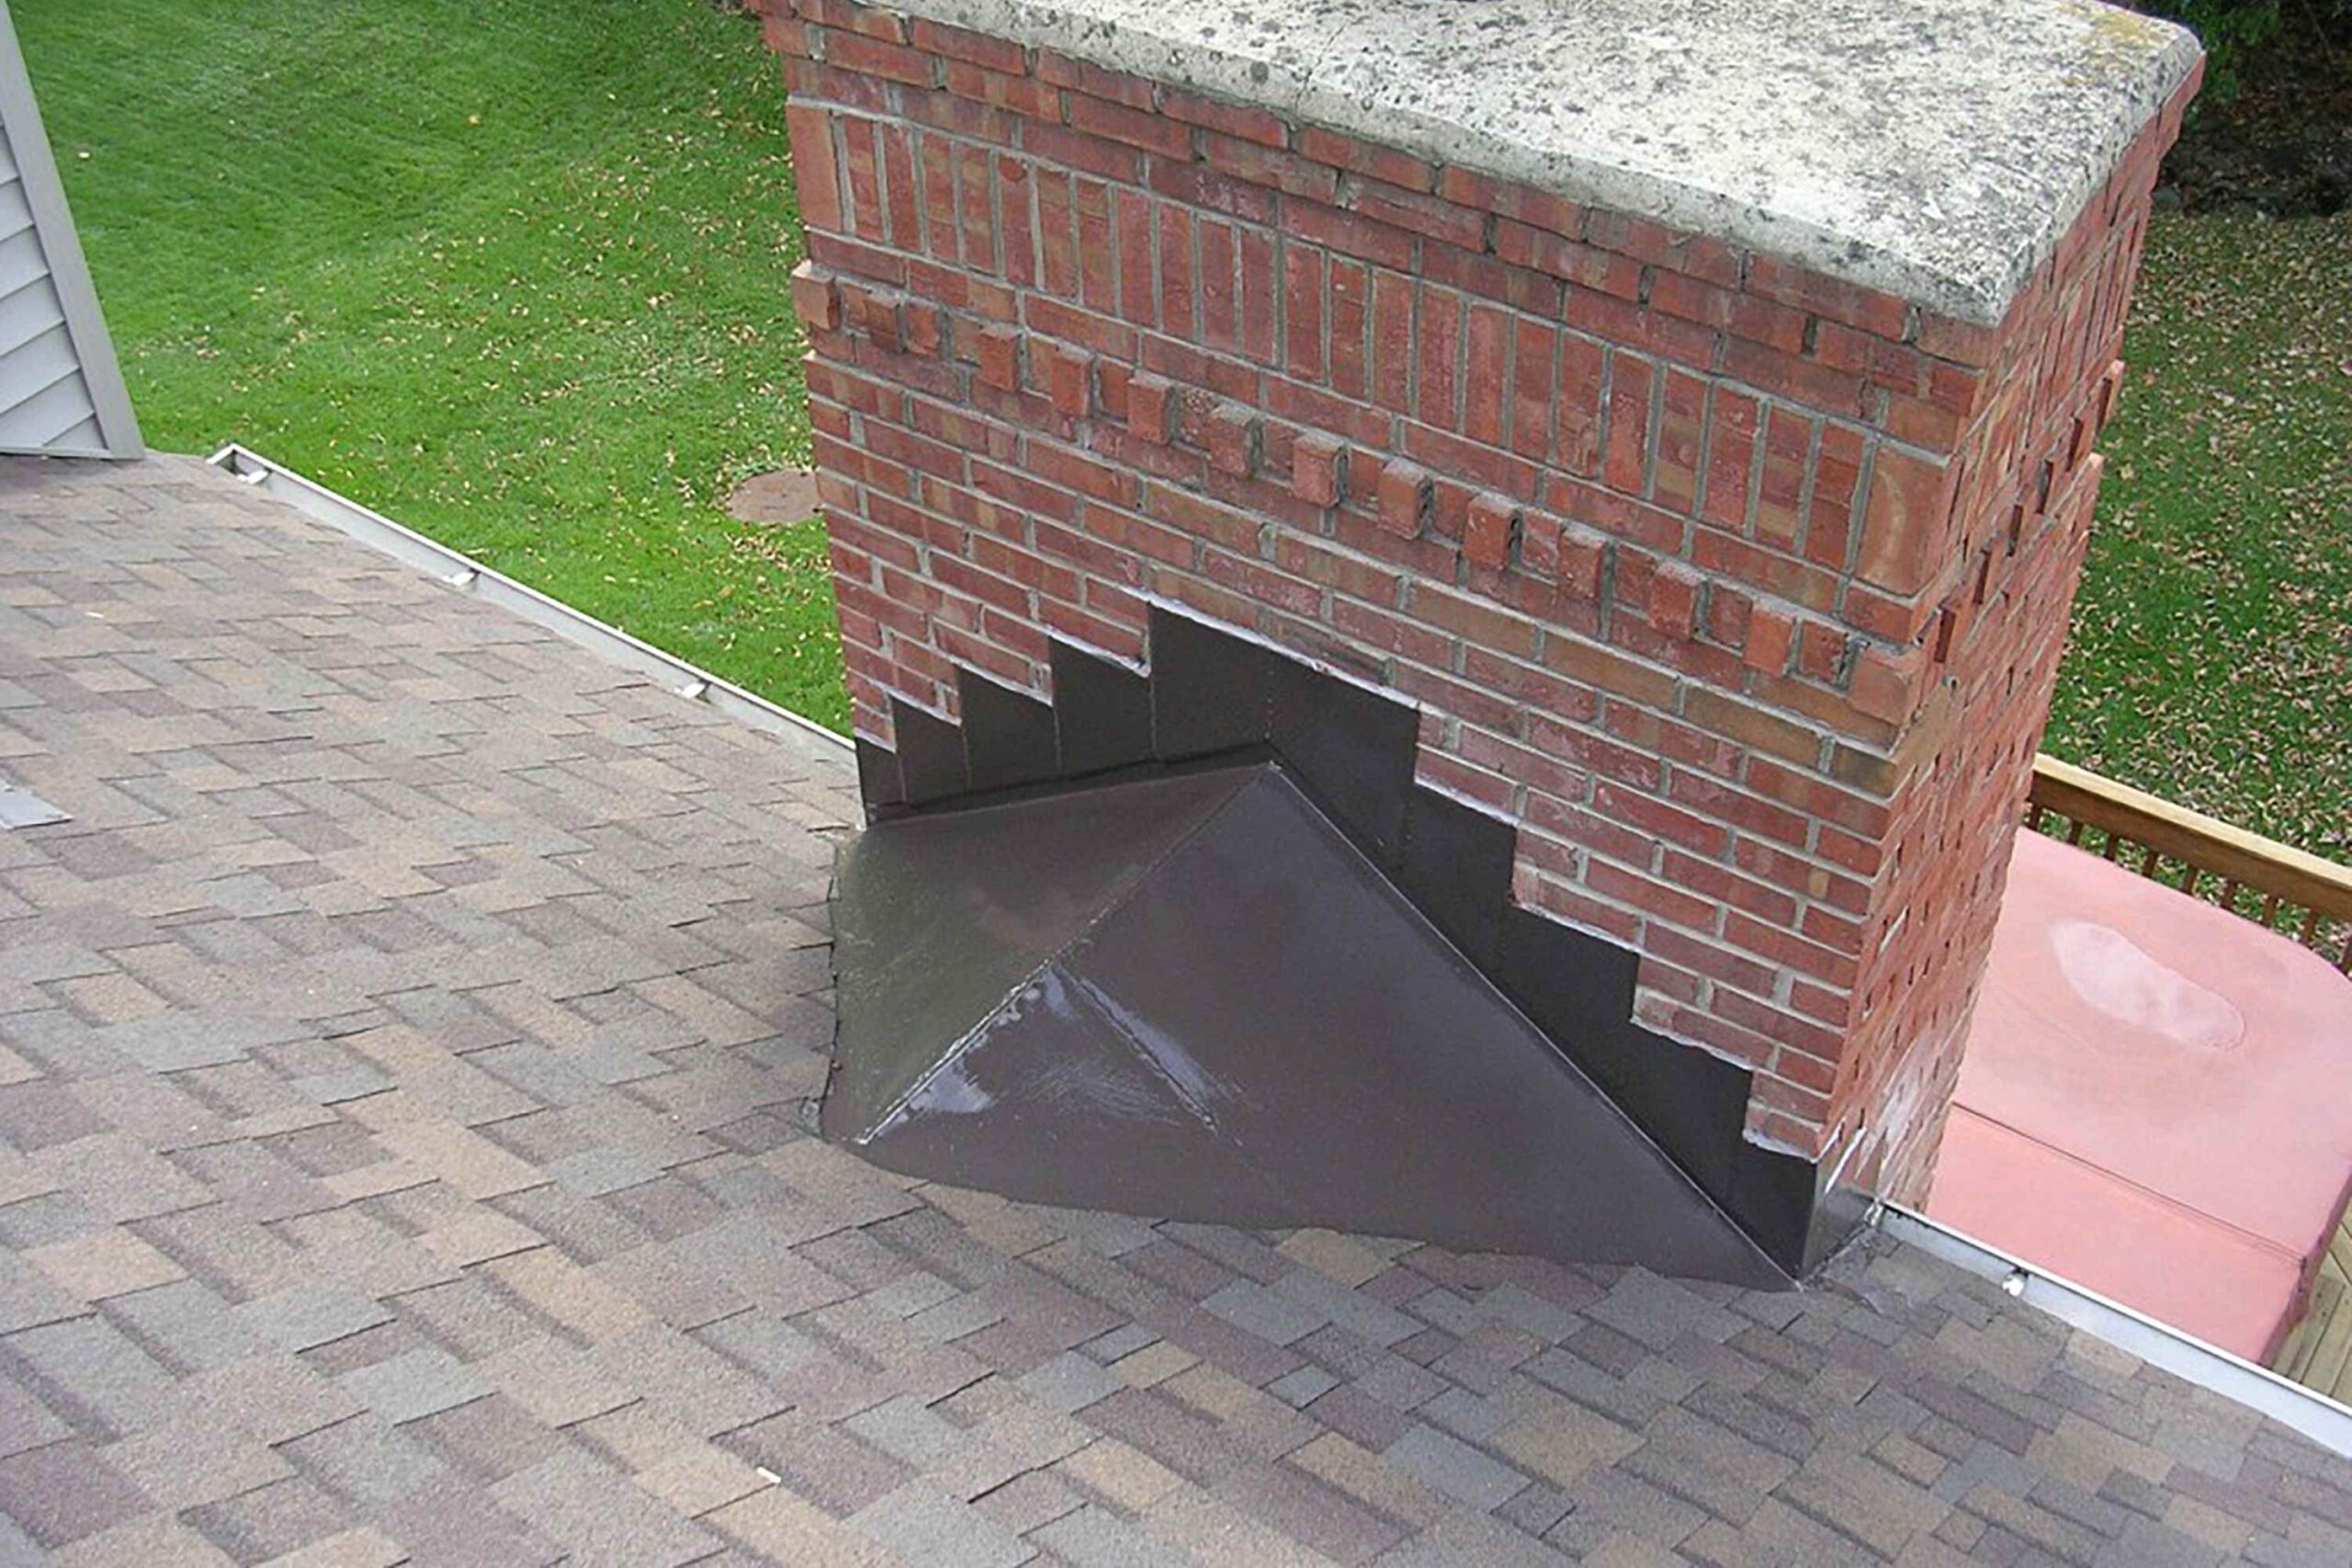
Chimney and skylight flashingChimney And Skylight Flashing
Chimneys and skylights pierce the roof’s surface and require specialized flashing types to ensure no water breaches the seal. Both structures face unique challenges due to their positioning and need custom-tailored solutions.
- Base flashing seals the bottom of the chimney.
- Counter flashing cut into the chimney’s masonry provides an additional layer of protection.
- The proper intersection of these elements deflects water away from the chimney.
- Often comes as a kit specifically designed for the skylight model.
- Includes a head flashing, a sill flashing, and two pieces of side flashing.
- Should always be installed by a professional to ensure a tight seal.
Attention to detail is paramount for chimney and skylight flashing installation. Even a minor mistake can lead to significant water damage.
Critical Steps In Flashing Installation
Ensuring the longevity and durability of a roof largely hinges on a singular, often-underestimated component: roof flashing. This critical element serves as the first line of defense against water intrusion, guiding rainwater away from the most vulnerable areas. A precise and strategic approach is paramount to the success and effectiveness of flashing installation—falling short in execution can lead to costly water damage and repairs. Let’s delve into the most vital steps in the flashing installation process.
Assessing Roof Structure And Materials
The initial step is a thorough assessment of the roof structure and the materials involved. This inspection is key to identifying specific requirements and challenges posed by the roof’s design and the materials’ compatibility with selected flashing. An exhaustive evaluation considers the following:
- Pitch of the roof – Determines the water runoff speed and guides flashing type selection.
- Existing roofing materials – Ensures compatibility and integration of the flashing with materials like shingles, tiles, or metal.
- Rooftop features – Identifies areas around chimneys, vents, and dormers that need tailored flashing solutions.
Precision In Cutting And Fitting Flashings
The effectiveness of flashing hinges on a flawless fit. Precision cutting and fitting are non-negotiable to prevent water seepage:
- Measure twice, cut once – Meticulous measurement and accurate cutting of the flashing materials avoid gaps.
- Custom fitting – Each flashing piece should be tailored to mesh seamlessly with the roof contours.
- Test fitting – A dry run before final installation catches potential misalignments or adjustments needed.
Sealing Joints And Edges For Complete Protection
After securing the flashing, it’s imperative to create a watertight seal. This step is critical for safeguarding the roof:
- Appropriate sealants – Utilize high-quality, weatherproof sealants designed for roofing applications.
- Attention to detail – Carefully apply the sealant around edges and joints to preclude any moisture ingress.
- Regular inspections – Routine checks post-installation ensure the seals maintain their integrity over time.
Common Mistakes In Flashing Installation
Proper roof flashing installation plays a critical role in keeping a building structurally sound by preventing water from seeping into places it shouldn’t. Despite this crucial function, flashing installation is frequently an area prone to errors. Identifying and understanding common installation mistakes can save homeowners significant expense and trouble down the line. Here are a few often overlooked yet critical errors to avoid.
Incorrect Flashing Material Choice
Selecting the right material for roof flashing is vital, yet it’s not uncommon to see errors in this area. The type of material impacts the durability and effectiveness of the flashing. Common materials include aluminum, copper, stainless steel, and various plastic composites. Each has its advantages and specific use cases:
- Aluminum: Popular due to its cost-effectiveness and pliability, but may corrode if not coated properly or used in coastal areas with salty air.
- Copper: Highly durable and resistant to corrosion, but can be expensive and should not come into contact with other metals to prevent galvanic corrosion.
- Stainless Steel: Known for its longevity and strength, suitable for most environments, but more costly than some alternatives.
- Plastic Composites: Less expensive and resistant to corrosion, but may have a shorter lifespan and are less suited to high-temperature fluctuations.
Choosing inappropriate materials can lead to premature deterioration, which ultimately results in leaks and damage.
Overlooking Key Vulnerable Points
Another common pitfall is missing critical areas that require flashing. Areas such as roof valleys, chimneys, dormers, skylights, and roof-to-wall transitions are particularly susceptible to water intrusion.
Installing flashing requires a clear understanding of water flow on the roof and the potential for accumulation. Without thorough coverage in these key areas, even the smallest gap or hole can become a conduit for water damage. Ensuring complete protection involves meticulous planning and precise installation.
Poor Workmanship Leading To Leakages
The best materials can’t compensate for shoddy installation work. Common workmanship errors include:
| Error | Consequence |
|---|---|
| Improper Sealing | Leads to immediate or eventual leaks |
| Incorrect Overlapping | Water can seep through joints if not overlapped correctly |
| Insufficient Fasteners | Flashing that’s not adequately secured can blow off or shift, exposing the roof |
| Not Accounting for Expansion | Metal flashing must be installed with room for expansion due to temperature changes, or it can warp and fail |
Professional installers encompass the skill to avoid these missteps and ensure that roof flashing functions effectively to safeguard your home from water damage.
Ensuring Quality In Roof Flashing Setup
Proper roof flashing installation is a critical aspect of maintaining a dry and damage-free home. Roof flashing acts as a waterproof barrier, preventing moisture from seeping into the joints and corners of a roof. This protective measure shields the most vulnerable areas where the roof meets other structures or features, such as chimneys, vents, and dormer windows. Ensuring the quality of your roof’s flashing setup not only extends the longevity of your roof but also safeguards the interior of your home from water damage and mold growth.
Hiring Reputable Roofing Professionals
The installation of roof flashing is a task that requires precise skill and experience. To ensure the highest quality, homeowners should prioritize hiring reputable roofing professionals. Skilled roofers will assess the specific needs of your home’s architecture to determine the most effective flashing materials and installation methods. They bring expertise in:
- Material Selection: Selecting the best materials for durability and weather resistance.
- Industry Standards: Adhering to building codes and manufacturer guidelines.
- Quality Workmanship: Ensuring tight seals and correct placement for optimal protection.
Regular Maintenance And Inspection
Over time, even the best flashing can succumb to wear and tear. Consequently, regular maintenance and inspection are key to preserving its condition. Professionals can identify and remedy issues such as:
- Loose or corroded flashing.
- Damage from severe weather conditions.
- Sealant failures.
Timely repairs can prevent minor issues from escalating, ultimately avoiding costly water damage repairs inside the home.
Correcting Installation Mistakes Early
Should any mistakes occur during the initial installation, it is crucial to address them immediately. Early detection and correction can save homeowners substantial expenses and headaches. Signs of improper installation include:
| Sign of Issue | Possible Consequence |
|---|---|
| Visible Gaps | Water Intrusion |
| Discoloration around Flashing | Moisture Damage |
| Rust or Corrosion | Material Failure |
By acting promptly, homeowners can ensure that the flashing continues to perform its vital role effectively, providing peace of mind and preventing further complications.
Frequently Asked Questions Of The Importance Of Proper Roof Flashing Installation
Why Is Roof Flashing Critical For Homes?
Roof flashing is vital because it prevents water penetration at joints or intersections on a roof. Proper installation ensures a watertight seal, safeguarding the home against leaks and potential water damage.
Can Improper Flashing Lead To Roof Damage?
Yes, improper flashing can lead to significant roof damage. It can cause leaks, which in turn may result in mold, rot, and structural damage. Ensuring proper installation is essential for roof longevity.
What Materials Are Used For Roof Flashing?
Roof flashing materials typically include aluminum, copper, galvanized steel, and lead. Each has distinct properties, such as durability and flexibility, making them suitable for different roofing requirements and environments.
How Often Should Roof Flashing Be Replaced?
Roof flashing should be inspected annually, but replacement depends on its condition. Flashing lasts for years, yet when signs of rust, damage, or leaks appear, it should be replaced immediately to prevent further damage.
Conclusion
To sum up, correct roof flashing is a crucial defense against water damage. It seals the joints, preventing leaks that can lead to costly repairs. For the integrity of your home, ensure professional installation. Remember, protecting your roof begins with precise flashing.
Secure your investment by prioritizing this key step.